
Sewing a stuffed sea turtle from scratch. This sewing project will require a little imagination and effort. You can make the sea turtle authenticate colors or spice things up with using some very colorful prints for the turtle shell. And then just keep the head and arms green.
Items you will need:
- Butcher Block Paper
- Pencil
- Bright Colored Fabric at least 12” square x2
- Bright Green Fabric (can be scraps)
- Sewing Thread
- Sewing Pins
- Polyester Filling
- Sewing Scissors

Instructions on making pattern:
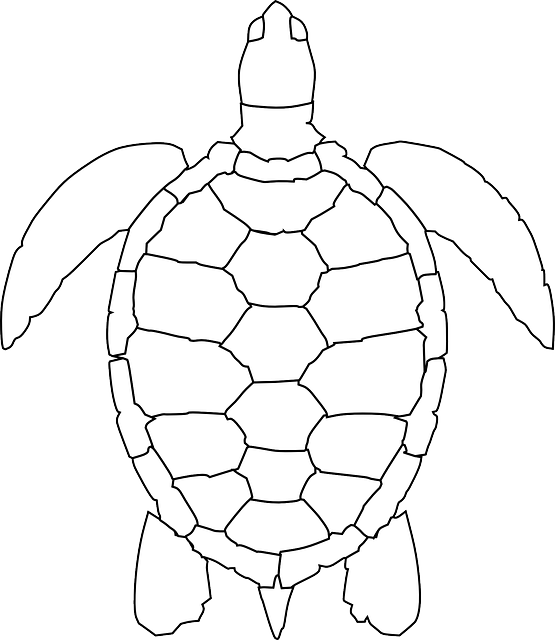
- Download the black and white Sea Turtle picture above and print it.
- This will be your pattern and you can make it bigger or smaller depending on what size turtle you would like to make.
- Trace the shell with the butcher block paper first
- Then trace the head and arms
- Pin your patterns on the material you have chosen
- Cut out the pattern (be sure and cut an extra ⅝” around your pattern for the seam
Now you are ready to sew the patterns together.

Instructions on sewing the pattern together:
- Begin sewing the head and arms first
- You will need to decide if you want the edges tucked in or sewn on the outside. Leaving a ridge around the head and arms.
- Begin with the head. Leaving right sides to the outside, sew around the neck, head and other side of the neck. Leaving the bottom open so you can stuff it with polyester filling.
- Then sew the arms, again with right sides towards the outside. The same way leaving an opening at the bottom for the stuffing.
- Now you are ready to sew the shell together and lets put the right sides on the outside of the shell too.
- But before you sew the shell, pin the head and legs to the inside of the shell so you will be sure and catch them when you sew the ⅝” seam all around the outside of the shell.
- Don’t forget to leave a gap at the tail end of the turtle to stuff it with polyester fill.
- Once the turtle shell is stuffed, carefully finish sewing your ⅝” seam around the tail end of turtle to complete the enclosure.
There you have your stuffed sea turtle ready to use to decorate with in your bedroom or study or where ever you would like to see a splash of color.
Thank you for joining me in this sewing project and if you have any comments or questions please leave them in the comments form and I will get back to you ASAP.
As always the highlighted links are monetized and if you click on them I may receive a commission.